
Here are some photos of the layout so far.
 |
| This is the entrance to the yard, looking south towards Demondrille |
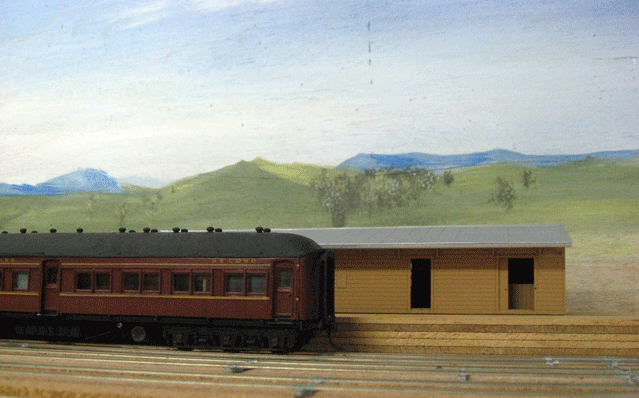 |
| Here is a view towards the station building; a "Workshop 5" ACS is at the "platform". |
 |
| Looking in the other direction. A Stephen Johnson signal box (not quite right for the prototype, but hey) and an Ian Lindsay A4 station building. Again, not prototypical for Kingsvale (which was a modification of the A4) but it will convey the right impression. There are three roads in the station precinct; the main on the left, loop and loading bank loop on the right. |
 |
| As you can see from the previous photo, this is my first attempt at a backscene. It's painted on a flat piece of primed 3mm ply; there are a few imperfections in the surface I should have repaired after priming. I'm quite pleased with this first effort, though there are some aspects which are clearly not right and I will try and correct these before starting a new one from scratch. Too many mountains for this part of the world. I couldn't get a recent photo of this scene because a number of trees have grown along the Kingsvale Rd boundary obscuring the horizon. |
 |
| Here is my #6 scratchbuilt point so far. This is code 55 rail, though I built the main line (at the top of the photo) in code 70. I hope that gives you some idea of my progress. The next two tasks (about which I'm procrastinating again) are finishing the detailing of the rails, painting and laying onto sleepers; and fixing the platform in place and completing the platform face. That's all for now. James. |
James the back scene looks great! I think it's the hardest part of building a layout. I've got a question about your isolation cuts in your point. how did you cut them, and the cut on the lhs of the point where the two tracks come out, have you thought of not cutting there and just finishing the rail at about 40mm or so? That way you don't need to make the cut obvious and you can stagger the joins as well? I love the fine rail it really is a bugger to work with, you must be a patient man.
ReplyDeleteGeoff
James, looking good - but... the spacing between the goods loop and the crossing loop looks the same where as goods loops were usually set out with more clearance around them and the prototype photo suggests this is the case here too. Geoff is right, the code 55 certainly is impressive.
ReplyDeleteThanks for the comments, guys.
ReplyDeleteIf I understand you correctly, Geoff, you are suggesting to make the frog assembly longer? I try and make the frog a similar length to the prototype (though there is no practical reason, as far as I can see - making it longer would probably be easier). I also make the frog as a separate assembly, so I don't use a solid length of rail and put the cuts in later, which again, is probably easier. The join does look a little obvious in the photo, but I think it will be ok once I add some detail. And yes, I can be a patient man. Don't you have to be in this hobby?
Craig, thanks also. You are quite right. Funny how you don't notice these things until you photograph them. Fortunately, I can rectify this now by adding a bit more rail after the turnout, before the goods loop straightens out, as per the photo.
Cheers,
James
Yes James, I normally make it longer so that it's easier to join the rails there with insulated joiners for DCC running. I make mine as one piece so not having to cut on one side of the point is alot easier, and also made in one piece as I'm not that confident in my abilities to line them up ok if in two pieces.
ReplyDeleteGeoff.