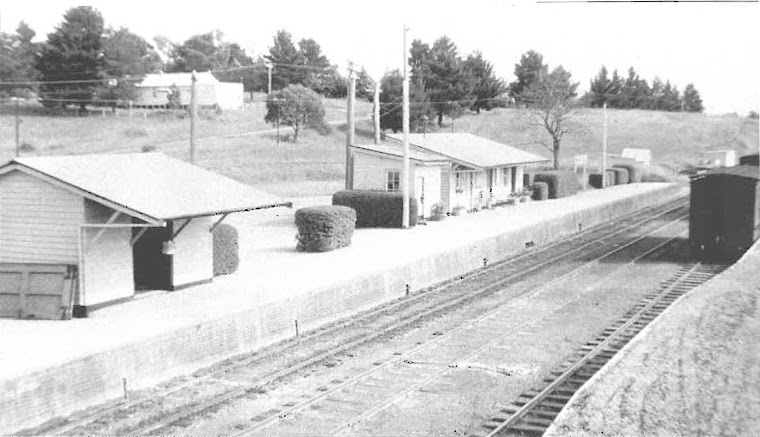
Kingsvale, NSW 1963

Kingsvale, NSW 1963
A view of Kingsvale station, looking north towards Cowra c1963. Courtesy Ken Ames, "From Grease to Gold Braid".

Wednesday 22 August 2012

Colour and light

The landscaping continues, and by doing a few hours a week, things are progressing nicely.

As this is the first significant landscaping job I've done on a model railway since I was a kid, I'm surprised about just how forgiving it is.  If the colour is wrong, you can go over it, sand it back, repaint it, whatever; but nearly any mistake can be rectified.

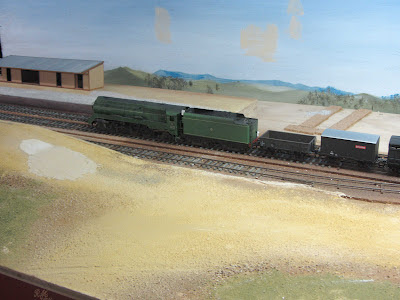
For best effect, landscaping progresses in layers and stages.  Using a several excellent references and a number of materials, the photos show where I've got to.  No area is finished yet, but you can see that some areas are close.


Two significant additions are the static grass applicator, which I made for under $35 following the instructions at http://csxdixieline.blogspot.com/2010/06/howto-static-grass-applicator.html  I tried it out today and it worked a treat.  This is surprising, because rarely do I find that something I have wired up first-go works.  In this photo, the area in the foreground has been landscaped with static grass.


Secondly, I scratchbuilt a rail-rack and gang shed.  Again, there are some excellent references available to help the modeller obtain an accurate and authentic result.  I recommend Branchline Modeller 1, and in particular Jim Longworth's article "A Desktop History of Gang Sheds in NSW" in ARHS Bulletin, May 1999, pp172ff.

I purchased a UNEEK rail rack, but was disappointed to find that it seems to be cast from a Code 100 rail master.  So it doesn't have that spindly look of the prototype, which would be made from much lighter rail.  So I scratchbuilt one from Code 55 rail, again with reference to the article in Branchline Modeller 1.  I'm happy with the result so far.  It needs a bit of dry brushing to highlight the detail. 

Further to my previous post, the gang shed appeared to be painted in medium stone, which James McInerney pointed out was little used after 1954 (Thanks James!).  Also, as Tom pointed out to me, (thanks Tom!) the latest Country Branch Lines book, which features the Blayney-Cowra cross-country line shows other gang sheds on the line painted the same colour.  So confident that the gang shed was medium stone in 1953, that it what I've painted it.  I've started weathering by giving it a couple of thin black washes which has settled nicely into the corrugations and around hinges and latches.

I've also given the station building a once-over to tone down the pristine medium stone and give it that slightly faded look.  The clapboard has been accentuated with a couple of washes of thin matt black humbrol enamel.


After painting with acrylics, the cutting on the northern end of the yard has been generously covered with red dust (from Chucks).  The prototype is a pinker red rather than this orange tint, but it's the base coat- I will work in some other flock and drip on some diluted acrylic to add some natural variation. 


Also, there are quite a few weeds growing in the cutting, as the recent photo below shows.


This view of the eastern face of the cutting clearly shows the variation in colour, particularly from the top to the bottom.


I am in the process of adding long grass and weeds using the process described in Barry Norman's Wild Swan book on modelling landscapes.  This involves bleaching carpet underlay fibres, glueing them in clumps and combing out the loose fibres before colouring with watercolours.  Hopefully, I will have some pictures of that next time.


Tuesday 24 July 2012

Landscaping

No blog entries for a while, but I'm pleased to say this does not imply no modelling!  I've had a few things on the go and with no uni this month, I've made fair progress, particularly with the landscaping at the northern approach to the yard.

2 July:

Plaster cloth has been layed over the polystyrene form.  Plaster has been added over this to strengthen the structure and to (visually) break up the surface.  The plaster has been roughly sanded to knock off any sharp edges and shapes in the plaster that make it look like plaster, rather than earthworks.

Some Woodland Scenics washes have been added to the plaster, though I was experimenting here.  In hindsight, I think the best use of this technique is for exposed rock.  Underneath flock, gravel, soil etc acrylic paint is more effective.  The access road to the yard is plain in this view.


This is the reverse view of the angle above, looking towards the station.

Here is the loading bank, a Sydney Hobbies polyurethane casting.

19 July:
After adding flock and various Chuck's Ballast dusts, I was not happy with the colouring.  It was far too brown, whereas the dirt road in this area are usually a yellow ochre colour, but quite pale.  So I experimented with yellow oxide and plaster which worked quite well.  It was a bit too yellow, particularly after spraying it with adhesive, and afterwards the surface was much too textured to look realistic.  I knocked this down by sanding with 240 grit paper.  This has been quite effective.  The underlying dried plaster created some white dust which gives a more realistic colour, as you can see above.  One thing I have learnt about landscaping is how forgiving it is.  You can't undo much, but you can just keep laying down more layers until it looks right.

There are two areas which I have patched because the ground was un-prototypically uneven.  They have not been coloured as yet.  Overall, I reckon it's looking ok.  It should look much better when I've added some scrub, blackberries and static grass.


Looking along the road into the yard.


3803 is an unusual visitor to Kings Vale.  Don't tell anyone.


 On the other side of the line I've layed some cork to show the low point of the terrain, where there is a creek running beneath the yard.  Beyond that is a flat area where the Fettlers Shed and rail rack will be.  While researching this structure, I came across Jim Longworth's excellent Bulletin article from 1999, "A Desktop History of the Gang Sheds of the NSWGR", and Kim Armstrong's article in Branchline Modeller 1.

I have chosen to do the ballasting last, the way it happens in reality. 


Here is a great photo of Kingsvale, which I estimate to be about 1970.  Indications are that gang sheds were not painted until this period, so my shed will be plain galvanised iron.

Until next time

James.


Sunday 3 June 2012

Modelling a platform - 2

Here's some more description of what I've been doing to model the Kings' Vale platform.

The real platform is covered in crushed quartz and this will be represented by fine white sand, available from Chuck's Ballast.  Under this, I have painted the platform a mixture of Humbrol earth colours to represent the clay usually found under the quartz.  It's mainly Sand (matt 63), with some Leather (62), Mid Stone (84) and Middle Stone (225) dappled-in when wet.


I painted the brickwork before attaching the platform to the baseboard for convenience.  This was sprayed using a mixture of Floquil Mineral Brown and Boxcar Red to give a base red-brown brick colour.


There is an opening in the platform face at the signal box, which would have been where the point rods and signal cables exited the frame.  Visiting the area recently, I could not see this opening in the platform (would they have bothered filling it in?  I wouldn't have thought so), it does seem to be present on the photo at the top of the blog and makes sense that the frame in the box would have controlled the up and down home and starting signals.

Because I forgot to make this opening earlier, I have had to perform some minor surgery with the Dremel.

After the base colour was completely dry, the mortar colour was heavily applied and then carefully wiped away so that it remained in the grooves of the etched brass brick sheet.
Capillary action draws the paint into the grooves and it tends to stay there.  Wiping the surface cleans the "mortar" off.  The effect is shown here.

Here you can see the edge of the balsa, which was subsequently filled and sanded.  It also shows how the thinned paint, when wiped away, remains in the mortar courses.  You can see on the top that some bricks are a terracotta colour, to represent the variation of brick colours in a batch.


This was some experimenting I did on an offcut.  The variation you see in real brickwork where the pointing has worn in certain areas or mildew has grown turning the white mortar black.

An area of pristine brickwork.

I am in the process of documenting this in more detail for a magazine article.
 
Until next time
James


Tuesday 29 May 2012

Progress at Kingsvale

Lately I've been diverted by selling my Mother's house and sorting out her retirement living arrangements, studying for my MBA, plus the usual work and family commitments. 

Anyway, things have been slowly progressing at Kings' Vale where I've been forming the landfall.  This has been a combination of polystyrene foam, plaster cloth and wall plaster. 

I think it's starting to resemble the prototype and should really look the goods when I've added colour and fluff (static grass and other stuff).  I've procured all the bits and pieces to make a static grass applicator, which can be the subject of a future post.

Here's the polystyrene foam forming up the cutting at the northern end of the yard.  I realise that Foamular extruded polystyrene is better for this purpose, but I only found out about this stuff after I had started!  Something to try next time.  The edges are taken off the foam sheet with this Surform gizmo which is very effective at quickly shaping the foam. It also creates heaps of mess.

 Here plaster sheet has been draped over the foam.  I learnt here that the foam wasn't shaped enough and the edges are too visible and prevent a nice, smooth and rounded landform. 


 This is where the mound at the entrance to the yard falls away and the road access to the yard can be seen on the left of the picture.

 From the reverse direction.

After some plaster was applied and smoothed out, the roadway is looking good.  I have started taking to the shoulders with a blunt chisel to create the ridges and troughs caused by runoff.

A few steps later, with some more plaster applied over the plaster sheet to hide the foam edges and provide material which can be fashioned with the chisel to represent the earthen embankment.

Nearing the end of this phase.  Just need to run over a few areas with the sandpaper, gouge a few faces with the chisel, fill a few holes and we're ready for colour. 

Looking forward to the Thornleigh exhibition in a couple of weeks and hoping to pick up half-a-dozen Austrains 4-wheel cattle wagons.

Opposite the station, there is a loading bank which I've also started to form up using the same techniques.  Before I get too carried away, I will need to paint the face of the Sydney Hobbies loading bank and fix it into place.  Hope to post some more photos of that soon. 

Cheers for now
James

Wednesday 14 March 2012

Modelling a platform - 1

It turns out I posted many of those photos of Kings' Vale already, so I must remember not to post so late at night.  Or perhaps it's a sign of early dementia.

Here is a bit more detail on how I went about modelling the platform for Kingsvale.

The platform itself is a piece of 19mm ply.  I glued a piece of 3mm balsa on the top which I shaped using sandpaper to represent the slight fall from the station building to the platform edge for drainage.

The ground also seems to fall away under the station building, and I presume that the building piers are slightly visible from the road side.  You can see the gap on the right edge of the photo.


The brick face is Keiran Ryan's etched brass English Bond, while the strip along the top is from one of the European manufacturers of styrene brick sheet (Kibri, Noch, etc).

There is a visible edge where the balsa joins the ply, so this was blended out with some polyfilla and sanded smooth. 


Not a great photo, but it shows the polyfilla applied to blend in the balsa
Another lousy photo, but the contour of the platform is just visible.


This one is another photographic masterpiece, showing the filler used to smooth the edge of the balsa


I've been finding a bit of time and getting into it lately, so I should have more posts to come in the next week or two.

Cheers
James.


Thursday 1 March 2012

Kings' Vale photos - 2010

Whoa, three posts in three days; I'll never keep this up.

Not sure I ever got around to fulfilling my promise of posting photos of Kings' Vale, so here they are.

This is a view south along the goods siding from the catch points.  You can see the platform and loading bank in the distance.  The middle road (the loop) was removed when the yard was "rationalised" in the 80's.

This is a view in the other direction, showing the cutting at the north end of the yard.  I am in the process of recreating this geological feature at the moment.  There is polystyrene foam everywhere.

Here is what's left of the station - but at least the platform face is still there.

The grain depot was built in 1964, so this won't appear in my layout.  The loading bank was extended around the same time, but I'm going to employ a little licence here and depict the bank as shown. 

The floor of the out-of shed

Here is the view of the yard looking north.

The platform and the cutting at the north end.  The short climb out of Kings' Vale can be seen on the right. A similar view to the photo at the top of the blog 50 years hence. 

The station master's house which has been unsympathetically modified over the years.  Fortunately, my model will not have to replicate that disturbing lean of the posts and house.  I just need to learn how to hold a camera straight.